HTML Boilerplates
If you are just starting out, or a seasoned veteran of web design, there is one weapon that you should have in your arsenal. That weapon is boilerplates.
Boilerplates are a quick way use your most frequent code. After all, who in their right mind would enjoy the tedious task of creating a new basic layout every time they start a new project? Really, a 2 column fixed width layout with a header and a footer is the same no matter how many times you do it. So it only makes sense right?
Getting Started
For this tutorial, we will be working with a 2 column fixed width layout with a header and a footer, but you can use these principles for any type of code or template that you do.
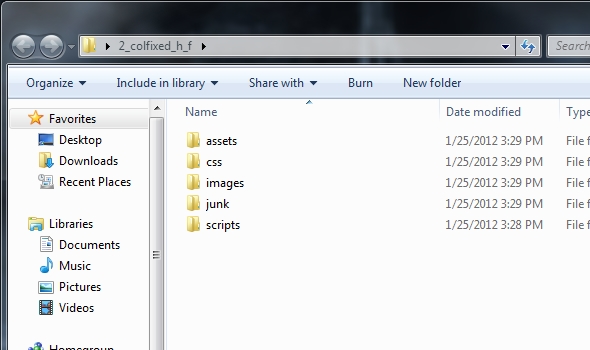
First things first, we need to set up our folder structure. Since this is a web layout, it is best practice to have the following folders in your site.

Now that we have a nice organized structure for the site, we are ready to make our boilerplate. Just duplicate and rename the folder whenever you create a new boilerplate or site.
Here is the purpose for each one of these folders:
- assets – To hold all of our stock images, PSD files, AI files etc.
- css – This folder is designated for styles that are outside of the main layout. An example would be IE specific styles.
- images – The images folder is meant for images related to the design layout of the site. Other images like gallery or products should have their own folder.
- junk – Any images, text files, html files, etc. that we don’t need anymore or you can get rid of, place them in this folder.
- scripts – It is good practice to keep your .js scripts or related in this file.
The HTML:
To start off, we need to code our basic html structure. This will include the DOCTYPE, html, head, title and body tags. Open up your favorite editor and enter the following Doctype.
[html]<!DOCTYPE HTML>[/html]
Since this is going to be an HTML5 boilerplate, the Doctype is pretty simple. It is just adding the HTML in the DOCTYPE. In previous version of HTML, It was a little more complex.
Next, we are going to add in the basic html structure. Right under the Doctype, enter the following code:
[html]<html>
<head>
<meta charset="utf-8">
<title><!–Site Title Here–></title>
</head>
<body>
</body>
</html>[/html]
Now we will add our links to our css, scripts and anything else we readily have available.
To do this, just before your closing head tag, enter the following code;
[html]<link href="style.css" rel="stylesheet" type="text/css">
<script type="text/javascript" src="http://code.jquery.com/jquery-latest.min.js"></script>[/html]
For me, I develop primarily in WordPress, so I put style.css in my site root. This is the default directory that WordPress themes call on. As for the jqurey link, this is something I use heavily as well. Feel free to link to what ever your choice of scripts.
That is it for the html structure. It is not too complicated, just remember whenever you create a site, remove everything between the title tags.
Now we want to create our two column layout. For this we will be working in between the body tags, so place your cursor after the opening body tag, and type in the following code:
[html]<div id="wrapper">
<header id="mainHeader"> </header>
<nav id="mainNav"> </nav>
<section id="mainContent"> </section>
<aside id="sidebar"> </aside>
<footer id="mainFooter"> </footer>
</div>[/html]
We are done with the HTML. You can add all other elements you want in here, for me, I have created boilerplates for horizontal and vertical nav, logos, search and tons of other elements. Whenever I need them, I use them.
Your page should now look like the following:
[html]<!DOCTYPE HTML>
<html>
<head>
<meta charset="utf-8">
<title>Untitled Document</title>
<link href="style.css" rel="stylesheet" type="text/css">
<script type="text/javascript" src="http://code.jquery.com/jquery-latest.min.js"></script>
</head>
<body>
<div id="wrapper">
<header id="mainHeader"> </header>
<nav id="mainNav"> </nav>
<section id="mainContent"> </section>
<aside id="sidebar"> </aside>
<footer id="mainFooter"> </footer>
</div>
</body>
</html>[/html]
The CSS:
For the CSS, since this is just a boilerplate, we wont make the styles too complicated. We are going to give the styles just enough for the base layout, fonts, colors, and links. It is just a simple task of changing colors or sizes, and then adding all other elements we may need for our site.
Create a new stylesheet and name it what ever you like, then add the following code in:
For theme reasons I add the following header in the stylesheet. This is used mainly for WordPress.
[css]/*
Theme Name: site name
Theme URI: site url
Description: a description of the site
Author: your name
Author URI: your url
Version: 1.0
Tags:
License:
License URI:
General comments (optional).
*/[/css]
Now under that add in the following css;
[css]* {
margin: 0;
padding: 0;
}
body {
font-family: Arial, Helvetica, sans-serif;
font-size: 100%;
line-height: 150%;
color: #333;
}
h1, h2, h3, h4, h5, h6, {
margin-bottom: 10px;
}
p {
margin-bottom: 10px;
}
a:link{
text-decoration: none;
color: #06C;
}
a:hover {
color: #900;
}
a:visited {
color: #06C;
}
a:active {
color: #900;
}
#wrapper {
width: 960px;
margin: 0 auto;
}
#mainHeader {
width: 100%;
height: 120px;
}
#mainNav {
width: 100%;
height: 40px;
}
#mainContent {
width: 660px;
height: auto;
float: left;
}
#sidebar {
width: 300px;
height: auto;
float: right;
}
#mainFooter {
width: 100%;
height: 120px;
clear: both;
}
.clearBoth {
clear: both;
}[/css]
Congratulations, your boilerplate is done. Now you have a streamlined way to create websites on the fly. With this particular boilerplate you can make the sidebar go on the left or right just by changing the floats of mainContent and sidebar.
If you liked this article, please be sure to share it and then comment below.